Whitewash Reimagined: A Modern Take on a Timeless Wood Finish
Whitewash: Key Takeaways
- Whitewash is made from lime, chalk, and water. It soaks in a bit, letting the wood breathe and show through
- People have been using it on cottages, barns, and churches since the 1500s; not just for looks, but because it helps keep things clean and bug-free
- In old American farmhouses, whitewash wasn’t just practical, it symbolized simplicity, freshness, and a clean start
- Legacy Handcraft has brought whitewash into the present with finishes that won’t flake or need constant touch-ups
- Want to try it yourself? Whitewashing is simple, forgiving, and perfect for showing off the natural charm of wood grain
Whitewashing isn’t a shiny new trend. It’s been around forever. Picture centuries-old cottages and barns in Europe sporting soft, pale coats of lime and chalk, not to look fancy, but to stay clean and keep bugs at bay.
Fast-forward to now, and whitewashed wood is making a quiet comeback. Designers are rediscovering that soft, lived-in look in everything from furniture to wall accents.
It’s the kind of cozy aesthetic that feels timeless, not trendy.
In this article, we’ll uncover:
- What whitewash really is
- Why it was so widely used
- How to whitewash wood
- How Legacy Handcraft continues to preserve its heritage through modern furniture and finishes
Style your walls with real wood character.
Explore Legacy Handcraft
Brief History of Whitewash
Whitewash has been used for hundreds of years, starting long before modern paints became common. It has roots in Europe and early America, where it served as a practical, affordable way to finish wood and buildings.
The brief history of whitewash includes:
- European origins: By the 1500s, whitewashing was common in England and Greece. Families applied it to cottages, barns, and churches to brighten dark structures and create a sense of cleanliness
- Colonial America: Early settlers embraced whitewash because it was inexpensive, easy to make, and widely available. Its ingredients were simple: lime, chalk, and water. Children were often trusted with applying it to fences, barns, and even the trunks of fruit trees
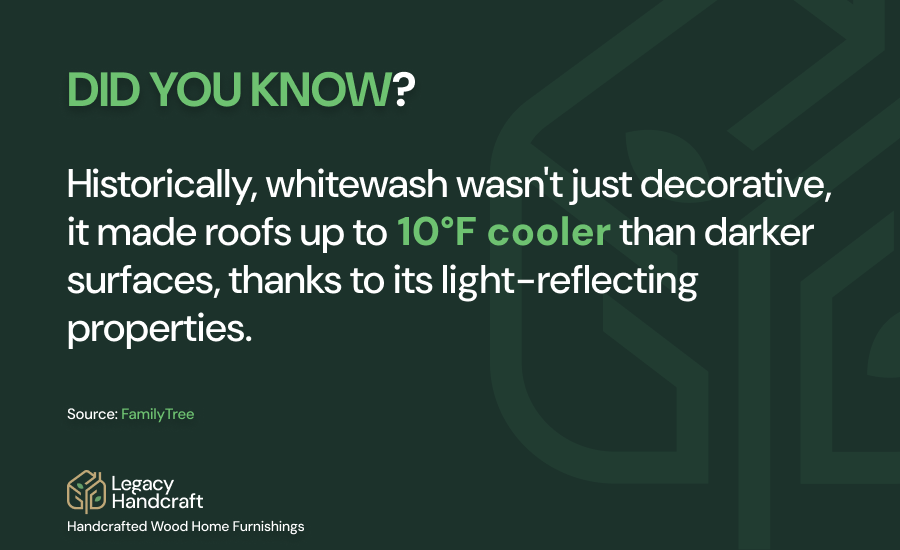
- Practical benefits: Beyond aesthetics, whitewash is known for combatting microbes, odors, and insects. This made it especially valuable in farming communities
- Cultural symbolism: Whitewash came to represent purity, simplicity, and community spirit. Churches often used it to reinforce the idea of cleanliness and sacredness

Why Is Whitewash Used on Wood?
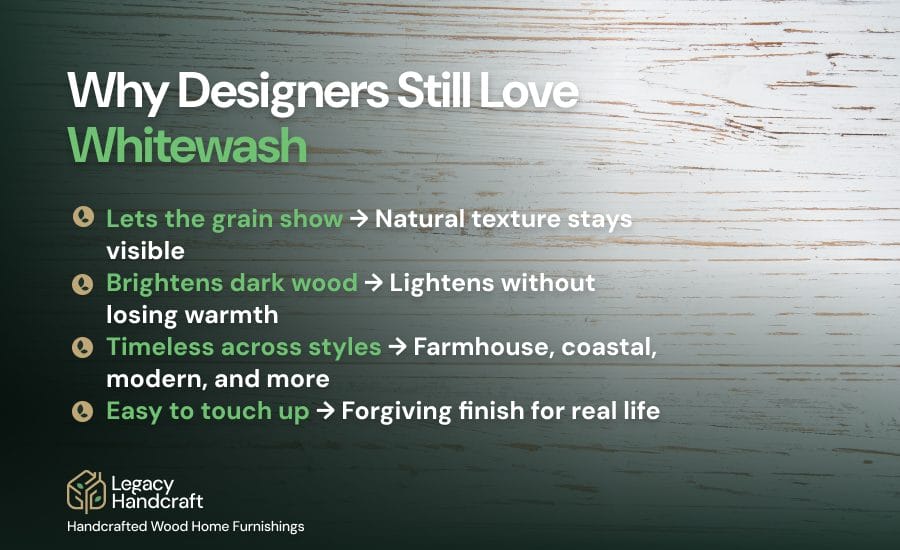
People love whitewash because it takes the edge off heavy wood tones. It lets the grain shine, sure, but more than that, it just feels… honest. Nothing flashy, just soft, calm character.
Homeowners, designers, and DIYers still choose it today because:
- It lets the grain show: Whitewash is semi-transparent, so the texture and knots of natural wood remain visible for a natural, crafted look
- It brightens rooms without stark paint: It lightens heavy woods and small spaces while enhancing warmth
- It has versatility across styles: Whitewash works in farmhouse, coastal, Scandinavian, modern, and other interiors
- It’s breathable and low sheen: Unlike many paints, whitewash feels matte and organic, which suits tactile, real-wood surfaces
- It’s easy to control and touch up: You can lighten or deepen the effect in layers, then spot-blend small scuffs later
How To Whitewash Wood
Want a soft, lighten finish that celebrates wood grain? Whitewashing is simple, forgiving, and very DIY-friendly.
Follow these clear steps to get an authentic look that feels crafted with purpose.
Step 1: Choose Your Wood and Your Look
Start by picking the piece and the vibe you want, from coastal airy to farmhouse rustic.
Here is how to decide:
- Smooth grain? That’ll give you a cleaner, sleeker finish. But if you’re after that lived-in, barnwood charm, go for knots. The messier, the better
- Previously finished pieces may need extra prep to keep the wash even and streak-free
- Decide on warmth. A touch of beige or gray in the mix creates a vintage tone, while bright white feels fresher and more contemporary
Step 2: Prep the Surface
Good prep is half the finish, so do not rush this part.
Do this before you open the can:
- Clean the surfaces to be painted with a mild degreaser, then rinse and dry so the wash bonds properly
- Smooth the raw wood with 120–150 grit sandpaper
- Scuff-sand varnished pieces to degloss them. Wipe away dust with a tack cloth
- Spot-prime resinous knots or stains with a stain-blocking primer to prevent bleed-through
Step 3: Mix Your Whitewash
You have two easy routes: diluted paint or a mineral whitewash.
Pick one and mix:
- Water-based paint wash: Start at 1 part paint to 1 part water for classic translucency. Use 1 part paint to 2 parts water for a lighter effect and 2 parts paint to 1 part water for an opaque finish
- Mineral or limewash products. Follow instructions on the label for a yogurt-like consistency that brushes on smoothly.
- Tint thoughtfully. A tiny touch of gray, beige, or raw umber softens stark white and adds age without hiding the grain.
Step 4: Not Sure? Test It First
Don’t skip the test. Whitewash always dries lighter than it looks when wet.
Make a small test and:
- Use an offcut or the underside of a shelf to test coverage and color
- Let it dry fully, then view it in daytime and evening light
- Adjust your ratio in small 10–15% steps until you love the look
Step 5: Apply in Thin Coats
Thin coats keep the grain visible and the finish even.
Use this approach:
- Work in small sections, applying whitewash with the grain using a brush or lint-free pad
- Keep a damp cloth nearby to blend as you go
- Maintain a wet edge to avoid lap marks
Bring home a finish that actually feels like home.
Contact us
CTA: Bring home a finish that actually feels like home. Contact us.
Step 6: Wipe and Reveal the Grain
This is where the character shows through.
Control the look as you go:
- After 30–60 seconds, wipe the surface lightly with a clean cloth to reveal grain
- Press a bit harder for a weathered, barn-wood effect
- Feather overlaps so transitions stay soft and natural
Step 7: Layer for Depth
Build color slowly rather than trying to nail it in one pass.
Layer like this:
- Let each coat dry completely, then reassess before adding another
- For subtle depth, add a second coat diluted slightly more than the first
- Want an aged tone? Mix a whisper of gray or beige into your second coat
Step 8: Seal or Stay Matte
Choose protection that fits the way the piece will live in your space.
Seal it smartly:
- High-touch shelves and mantels: finish with a water-based matte polyurethane or hardwax oil to keep the look natural
- Avoid glossy sealers that can make the surface look plastic
- To prevent imprints, let the finish cure fully before styling the piece
Step 9: Style and Care
A few simple habits keep whitewashed wood looking beautiful.
Keep it looking fresh:
- Dust with a soft cloth and avoid harsh cleaners that can dull the finish
- Use felt pads under decor to prevent scratches and shine spots
- For tiny scuffs, dab on a little of your diluted mix, blend, and let dry
Pro tip: If you love the whitewashed look but prefer a ready-made finish, choose pieces that arrive prefinished in a whitewash tone. You get the authentic character and the durability, without the trial and error.
Preserving Whitewash Wood Legacy Today
While traditional whitewash was simple and rustic, today it has taken on a new role: bringing warmth, character, and authenticity into modern homes.
What once coated barns and farmhouses is now being reimagined as a design choice for shelves, mantels, and walls.
At Legacy Handcraft, we believe whitewash shouldn’t be dismissed as nostalgia. It is a finish that allows the story of the wood to shine through while adding a timeless, light-filled look that never feels outdated.
Here’s why whitewash remains relevant today:
- Natural beauty shines through: Unlike paint, whitewash does not fully cover the wood grain. This creates a layered, organic look that highlights the texture and history of reclaimed wood
- Versatile design appeal: Whitewash works across styles, from farmhouse and rustic to modern and minimalist. It can soften the heaviness of darker woods while keeping their character intact
- Eco-friendly option: Traditional whitewash used simple, non-toxic ingredients. Even modern versions remain a sustainable alternative to heavy, chemical-based paints
- Low maintenance: Once applied, whitewash requires little upkeep. It ages gracefully, blending wear into its charm rather than needing constant touch-ups
- Easy to incorporate: If you want the look without the work, choose pieces already finished with a whitewashed style. Legacy Handcraft offers reclaimed wood shelves and mantels in finishes that carry this same authentic character, without the hassle of mixing or applying it yourself
Pro tip for homeowners: If you’re trying to create a cohesive look, pair whitewashed wood with neutral walls and natural textures like linen, clay, or stone. The contrast will allow the warmth of the finish to stand out while keeping your space bright and inviting.
Legacy Handcraft: Whitewash Reimagined for Modern Living
From historic cottages to today’s clean, light-filled interiors, whitewash has always done one thing well: celebrate real wood while brightening the room. If you want that balance of character and calm, you do not have to compromise.
At Legacy Handcraft, we craft pieces that honor this tradition with finishes that feel authentic and live beautifully.
Our artisans select quality hardwoods, apply thoughtfully developed whitewash tones, and build shelves, mantels, bookshelves, and furniture that fit real homes and real life.
With Legacy Handcraft, you can:
- Choose ready-to-install pieces finished in timeless whitewash that reveals the grain
- Match tones and dimensions across shelves, mantels, and custom furniture for a cohesive look
- Get guidance on sizing, spacing, and styling so your room feels balanced and intentional
- Choose durable, low-maintenance finishes suited for everyday use
- Bring reclaimed character into modern spaces without DIY trial and error
Bring the whitewashed look home.
Book a design consultation
Whitewash, Whitewashed Wood, And Whitewash Paint: FAQs
What is whitewash?
Whitewash is a simple, breathable finish made from water and mineral ingredients. Traditional mixes use lime and chalk. Modern whitewash paints use water-based binders that still let the wood grain show through.
Is whitewash different from regular paint?
Yes whitewash is diffrent than just painting wood shelves. Paint sits on top of the surface and creates an opaque coat. Whitewash penetrates lightly, softens color, and allows texture and grain to remain visible. The result looks natural, airy, and less “painted.”
Why do people whitewash wood?
Three reasons stand out: it brightens dark wood, keeps the texture visible, and adds a timeless look that pairs with many styles. It is also an approachable finish for DIYers because it is forgiving and easy to blend.
Is whitewashing wood still in style?
Absolutely. Whitewashed wood works in farmhouse, coastal, Scandinavian, and modern spaces. It balances clean lines with natural character, which is why designers still reach for it.
Can I whitewash finished or stained wood?
You can, but prep matters. Clean the wood thoroughly, scuff-sand to dull the sheen, and spot-prime bleed-prone knots. Always test your whitewash on a hidden area first to check adhesion and coverage.
What ratio should I use to make whitewash paint?
Start with 1 part water to 1 part water-based paint for classic translucency. If you want lighter coverage, add more water. If you want more opacity, reduce the water a touch. Adjust in small steps and test as you go.
Does whitewash work on reclaimed wood?
Yes, and it looks beautiful. Reclaimed wood has texture and history that whitewash highlights rather than hides. If you want the look without the DIY, check out Legacy Handcraft’s whitewashed finishes that capture this character consistently across shelves and mantels.
Will whitewashed wood turn yellow over time?
Quality water-based products and proper sealing help prevent yellowing. Avoid oil-based topcoats if you want to keep the tone crisp. Choose a matte water-based polyurethane or hardwax oil for protection without adding warmth.
Real wood has a story.
Let’s Help it Speak Through Your Walls


